Thursday, June 20, 2013

Jewelry Stands


 One of my revamping projects for my business is to take better pictures and making a better display, while still on a budget.  I want everything to look professional, but when your money is funny, you have to make do.  Here comes my version of DIY jewelry displays.    Let me show you what I mean. 

I found these acrylic cases at my local thrift shop

30 cents is not bad, plus they come apart for additional storage of business cards, bracelets or earrings.   Ya think?
Sorry about the mess.  Sometimes, I create better in total disarray.    I found this photo frame at another thrift shop.  The frame was surrounded by glass beads.  I stripped the beads(to be shown later).  The backing was just the right size for a earring display. 

I added white board, trimmed off the excess, and punched to holes for the earrings to hand from.  At a garage sale, I purchased this photo frame.   Unfortunately I did not take a pic of the beaded frame or the glass.  I plan to use the left over   glass as another back drop when taking pictures.  Waste not want not. 


I can't believe my luck.  I found this lighted display at the same thrift shop.  Only $1.50.   Now I can use an under light to help when taking pictures.  
This is how it looks in a dark room.   I will post my pic after using this light, so you all can see.  Get it?  Never mind that spot in the upper right hand corner.  I plan to paint that and use a bulb with a higher wattage, say about 75 daylight.  This should give my pic's even more definition.   We shall see.
Here is what I am really excited about.  I found this piece at another garage sale.  Only $1.00.    Can you guess what I am going to do?
When you put the pieces together, this is what you have.   I plan to make something else.  I decided I needed something white to showcase my necklaces.   This was the perfect stand.
I traced  the shape on to white board.  I cut two pieces, front and back.


Next, I taped both pieces to the side of a white box that I already had.

Here is the side view.  This old box will help this display stand up.


I used tape strips to adhere the cutout to the display.
Here is one side of the finished(well semi finished) display.  I plan to cover the bottom again with more white board.  If not, I can always crop out the bottom.
As you can see, all I need to do is trim the excess.  

As my creativity holds out, I shall be making more displays.  Stay tune. 


Sunday, June 16, 2013

I am on a budget

I am revamping my jewelry business. Details in a later post.     Since I have been home, I have been getting a lot of work done, but there is still a lot of work to do.   I will usually stop into Hobby Lobby, Jo-Ann Fabrics or Hancock Fabrics to see if they have any clearance or sale items, that I can incorporate in my merchandise(I am on a budget).  I found luck at  Jo-Ann Fabrics.   They are only  $1.00 a piece.   One whole dollar.   I think I can manage that.    Look for my creations to follow.     Remember, we are once nation under a groove.  Bye Ya.

The jewelry findings are gold tone.
  Sorry about the shot.
  Some of the pieces look tarnished.   Not so.
They are mixture of different tones

This is without the cover.
This is the copper set.
Copper is such a rich tone.


And next on the agenda is Pewter.  


 It doesn't get any better than this.     

Sunday, June 9, 2013

School's Out


*****************************************************
********************************************
*********************


It has been a while since my last post.   Lets see, my computer was not working, and running back and forth to library is a pain.  Plus I  lost some of my zeal for making jewelry.  My passion went out of my passion.    But now, school is out; and my computer is fixed(thanks Al).  The summer is starting to heat up(or so I have been led to believe).   The weather is not playing nice.  

Now that I am back online, I can take care of my Etsy Store. Sadly, I have been so busy, it has been neglected. It was time to get my  Etsy shop back into some respectable shape.  Here are some pieces that never made its way to my store, but I happy to say, they found a new home.


Simple glass seed/wood beads with a simple white shell center.   


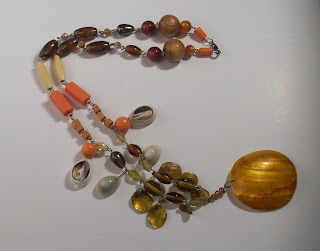
This is actually two necklace joining forces to save the world.
 Or maybe just to look pretty.  

 Since I had some orange beads left over, why not. 
 Waste not, want not.


I call this piece "Orange you glad to see me", LOL.     It is  mixture of shells, wood and glass beads.  Sometimes, I crack myself up. 


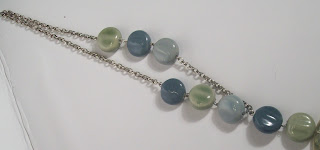
The beads in this piece are ceramic.  I added a green shell center and some silver embellishments.   Truth be told, they were part of  a set of napkin ring holders(I believe at Target) I found.  Never know where inspiration will hit you.  I decided to make it lopsided.  I think it adds character to a piece.

I will be showcasing pieces from time to time.    Check back with me.   You can also follow me on Twitter, Facebook and Pinterest.

You can also check out my other blog, Digging In the Box.  I love to up cycle, recycle and restyle existing pieces from thrift shops, garage, consignments and donations. 


Remember, I Just Living for the Weekend